Author Topic: Let's face it ...No worthy ebike battery carrier exists in the market !  (Read 8385 times)

Offline Avantgarder

  • Confirmed
  • Magic Undergrad
  • ***
  • Posts: 66
All current ebike battery carrier applications in the market are rear carriers and basically locate your centre of gravity somewhere between Venus and Mercury (when you ride away from them)...
I have a friend who has cool metal shop. He offered to help me and produce a carrier that will locate the battery inside the triangle of the frame.
This way the 10kg battery will be low and centred. The problem is that since it's a one-off, costs will be very high and be in the area of 200$ .
If such a product was mass produced, costs could go much lower and demand for that would be high I believe.
My top tube is a heavy duty bar for baby carrier which has a rectangular profile. This makes the design of the desired battery carrier very easy but still there's nothing for me on the market.
I know that every bike has a different frame but still, I can think of flexible solutions that would fit any bike.
Any thoughts ? Suggestions ?
« Last Edit: March 10, 2012, 11:48:43 AM by spellchecker »

Offline Avantgarder

  • Confirmed
  • Magic Undergrad
  • ***
  • Posts: 66
Here is my ebike...
« Last Edit: March 06, 2012, 09:04:25 AM by Avantgarder »

Offline Andrew

  • AKA The Artful Bodger
  • Confirmed
  • PhD. Magic
  • ******
  • Posts: 717
  • I'm here to learn.
I have designed and have had made two differing sized frame bags.

Materials
1 metre of 1000 Denier Kordura fabric. It's lined heavy duty fabric like good quality ruck sack.www.fabricuk.com

1 metre of 2 inch velcro (hook n loop)
1 metre of 4 inch velcro (hook n loop)

A heavy duty zipper 16/18 inch depending on frame bag size

Make a cardboard template of the space you want to fill in your frame

Find seamstress/Alterations shop with a heavy duty sewing machine.

Take this image and edit it to your shape/dimensions to the seamstress with the materials and template


Here's one on my bike....


Lastly. When you get the bag, turn it inside out and cover all stitched seams with a latex glue i.e Copydex.  This will ensure any loose stitches become water tight.

Finally, just use some foam padding inside the bag to stop the battery pack from knocking against the frame.  You'll be able to keep your controller and all wiring neatly in the bag too.


Andrew ;D
« Last Edit: March 09, 2012, 12:54:47 AM by spellchecker »

Offline Bikemad

  • Global Moderator
  • Professor
  • PhD. Magic
  • ******
  • Posts: 5,523
Great job Andrew, but why isn't it colour coordinated to match the bike?
A black bag with red straps would have blended in nicely with your black panniers and red frame.

I would have made a few alterations to the design if I was making one similar to that:
  • Extend the top flap so it runs along the entire length of the bag for additional strength and better protection against the rain.
  • Put the zip along the centre of the top piece so that the zip, along with the wires entering the bag, is concealed by the Velcro flaps.
    This would also remove all load from the zip when the bag is hanging from the flaps.
  • Punch a couple of holes and fit some eyelets at the front and rear of the top flaps to allow a couple of small suitcase type padlocks to be fitted.
  • Stitch some fabric carrying handles inside each of the top flaps, positioned around the centre of gravity point. These would remain totally concealed whilst on the bike, but would come in very handy for carrying your battery pack indoors for charging etc.

Andrew, I'm a bit disappointed that you didn't have a go at the needlework yourself.  ::)

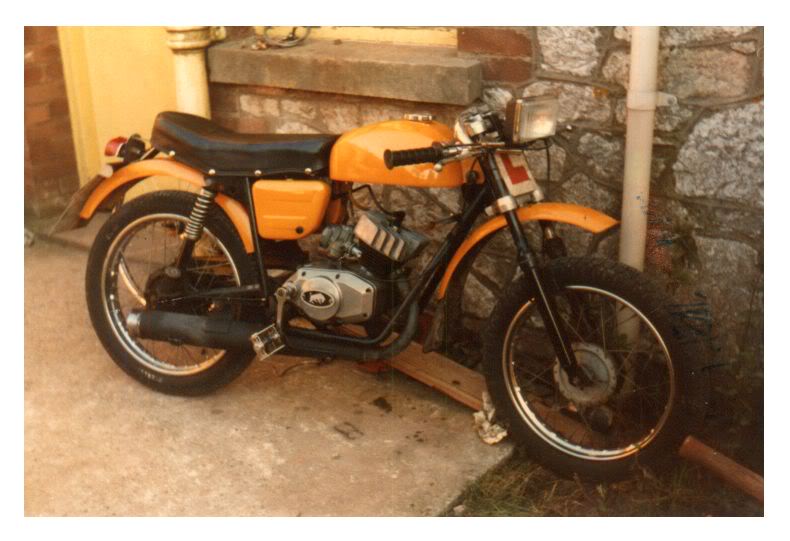
My first attempt at sewing was with an old treadle powered sewing machine, which I used to make a seat cover for one of my mopeds when I was sixteen:


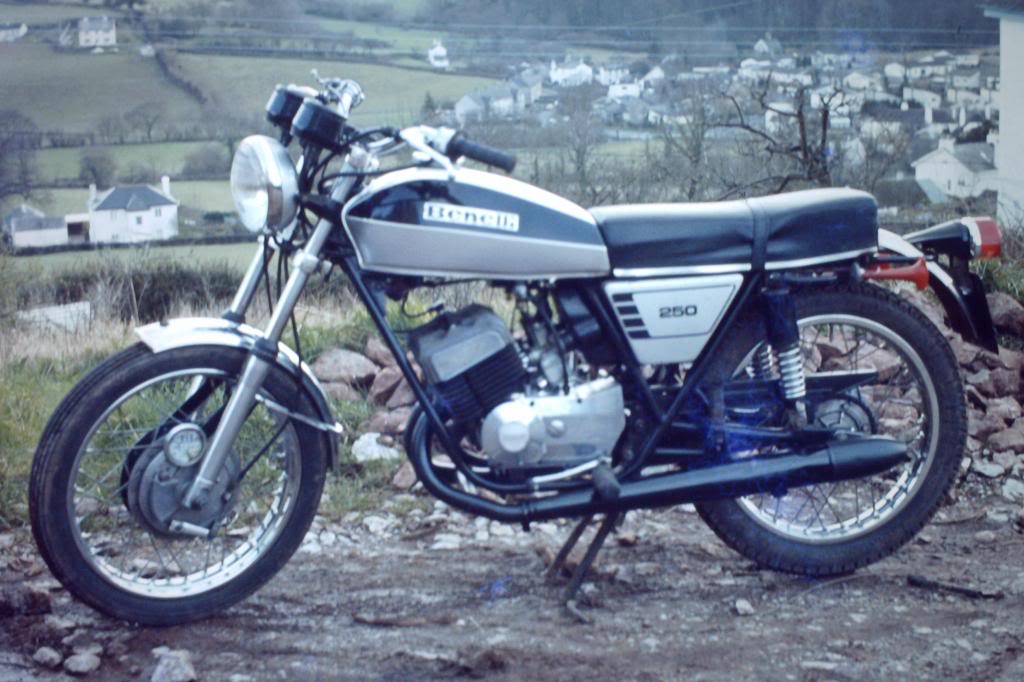
And this was my second seat a year or two later:


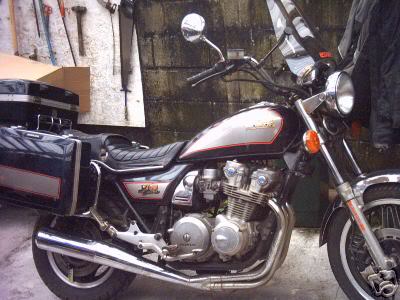
A few years ago, I bought this lovely cheap bike on eBay, but it had a very badly worn seat cover that was basically just held together with duct tape:


I decide to take what I thought would be the easiest option, and purchased a replacement seat cover (also on eBay). Unfortunately, no matter how hard I tried, I could not get it to fit properly and it looked awful.
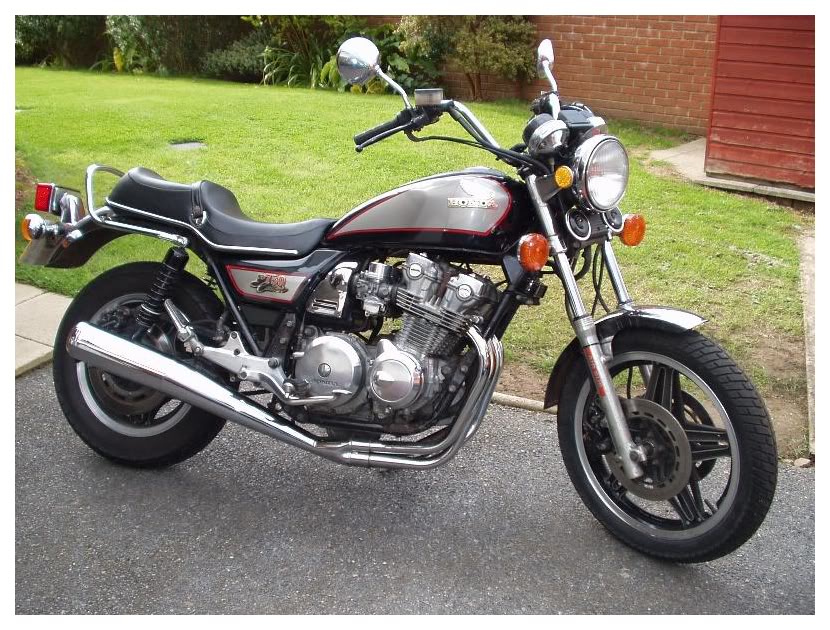
I picked up some fabric backed black vinyl and some heavy duty thread from a local material shop, and used what was left of the old cover as a template to make a new cover from scratch.

And here is the end result:


Although, I have to admit that the wife's electric sewing machine did struggle a bit with the thick material, but at least I managed to complete the job without breaking it. ;D

So don't be afraid to try something new, I was genuinely amazed at how easy it was to get a professional looking result with just a bit of practise and a lot of determination. :)

Alan
 
« Last Edit: July 02, 2017, 10:54:57 PM by Bikemad »

Offline Avantgarder

  • Confirmed
  • Magic Undergrad
  • ***
  • Posts: 66
Very nice job Andrew !
I was actually thinking about a rigid solution.
Something like a metal case hanging from the top tube. The case would have to be open on the upper side.
The only way I can think of securing the battery in that metal case is a combination of gravity and tight spongy upholstery.
I have the big heavy battery :  http://evalbum.com/img/2880/2880d.jpg
Here is a lousy sketch I made (I'm not Da vinci...)

Offline Avantgarder

  • Confirmed
  • Magic Undergrad
  • ***
  • Posts: 66

Offline Andrew

  • AKA The Artful Bodger
  • Confirmed
  • PhD. Magic
  • ******
  • Posts: 717
  • I'm here to learn.
Alan,, Not easily impressed are you  :D   ::) !!   Thanks for the pointers (and there was me feeling smug!).
The bag shown on the bike is actually used on my silver Specialized bike which has a smaller frame and  not for the 20" frame in the picture. The bike in the picture actually has a blue frame bag which really does not colour conform to the frame ,, not sure what I was thinking when I ordered the material ???.   There is plenty more I could say about about the points made above and the pros n cons ::),, but we'll leave that until I've had a couple of glasses of home made honey wine tonight ;)

To Avantgarder,  I will try and take a picture of my finished red bike(above) with the blue bag attached.  I've managed to get an 84v / 12ah( 2x36v packs in series, although packs are custom made shapes) into this bag with room left for an Infineon controller, all wires and a choc box with a voltage converter inside to power a rear light.  1000D Kordura is heavy duty and fairly stiff.  The weight of my packs and accessories must weigh about 9 or 10kgs.


Fibre glass would be a good way to go ??  make a mould first etc.  Perhaps YouTube would be a good place to look for a tutorial?


P.s. Loving the bikes Alan. :)
« Last Edit: March 10, 2012, 11:52:01 AM by spellchecker »

Offline Avantgarder

  • Confirmed
  • Magic Undergrad
  • ***
  • Posts: 66
Andrew,
I think I'll leave the controller on the back carrier where it's ventilated.
Putting a 1500w controller in a closed kordura bag in 40c summer temperatures seems a recipe for disaster...
« Last Edit: March 10, 2012, 11:51:23 AM by spellchecker »

Offline Andrew

  • AKA The Artful Bodger
  • Confirmed
  • PhD. Magic
  • ******
  • Posts: 717
  • I'm here to learn.
I'm sorry you have to endure such harsh hostile atmospheric conditions. It makes me feel lucky to live in Sunny South Wales.

Here's my bag in all its simplicity
« Last Edit: March 11, 2012, 08:44:16 PM by spellchecker »