Author Topic: Video updates of my Set up.  (Read 6564 times)

Offline PaintingLoft.com

  • Confirmed
  • Junior Member
  • **
  • Posts: 38
    • my flickr page
Video updates of my Set up.
« on: September 20, 2008, 10:53:51 PM »
Videos of latest progress.  will be adding on!!

Whadaya think?

http://www.youtube.com/watch?v=Mu5HsRKlMdc

Offline Leslie

  • Confirmed
  • PhD. Magic
  • ******
  • Posts: 2,047
Re: Video updates of my Set up.
« Reply #1 on: September 21, 2008, 12:31:22 PM »
I think its awesome man.  That golden motors kit really shines.

The only thing is the twist grip id mod on this bike. 

You know what happened to my rear motor when my twist grip came off? The Wheel got stuck at full throttle.  I had to put it back on and hold it in place to get it home.  One of the small plastic tabs broke and it wouldnt stay on safely at all.

This IMHO is one of the mods that goes down on my list as crucial for safety reasons.  I got the mod somewhere from these forums.

Cut the end off your twist grip and replace the end with a (excuse the expression) tight butt with low friction washers in between the butt and whats left of the twist grip.
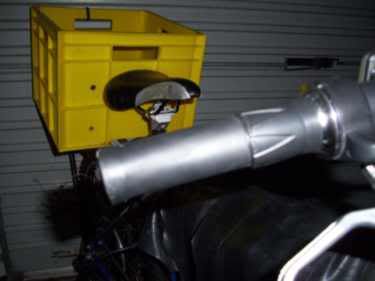

This is the broken twist grip still working and I can lift the entire bike 15kg sla's and all with this twist grip and it wont I mean "wont" come off.

You probably wont have the same problems as me with weight however in case you bump it on the a pole you might get yourself into hot water....

This mod also almost if not takes away the need for brake switches as when you go to grab the brake you release the throttle naturally.

Also I read you can cut and leave 3/4 of an inch left of the throttle but don't quote me on that one.  I did mine for comfort and left some grip contour on the twist side. If you want it to look pro buy another left grip and cut the end off it at the right length to retain the GM look.

The low friction washers IMO are important as the twist can get a lil sticky.

Its best to do it before they break as it is a better job...


Very nice mongoose BTW.
« Last Edit: September 21, 2008, 12:57:26 PM by Smeee »

Bring it on

Offline Nicobie

  • Confirmed
  • Junior Member
  • **
  • Posts: 36
Re: Video updates of my Set up.
« Reply #2 on: September 21, 2008, 05:04:20 PM »
Hi Scott,

Have you taken it for a ride yet? What is its top speed?

BTW, I got the charger in the mail yesterday. You did a nice job of packing, and it made it in one piece. :)  Haven't had a chance to test it as I still have a bit more to do on my 36v to 48v conversion. I should get it done today.

Nick

Offline PaintingLoft.com

  • Confirmed
  • Junior Member
  • **
  • Posts: 38
    • my flickr page
Re: Video updates of my Set up.
« Reply #3 on: September 21, 2008, 10:24:55 PM »
no prob nick.  hope it isn't wired backwards like I read about another one on this forum.  you might want to check before you plug it into your battery (just in case)

I bought this mongoose from a yard sale because the front forks on my good bike were too thin and made of graphite.  I also picked up one of those kid carriers that I can hitch onto the back of the bike for the grocery store.

will post pics of that latter.

Offline Leslie

  • Confirmed
  • PhD. Magic
  • ******
  • Posts: 2,047
Re: Video updates of my Set up.
« Reply #4 on: September 21, 2008, 10:35:44 PM »
no prob nick.  hope it isn't wired backwards like I read about another one on this forum.  you might want to check before you plug it into your battery (just in case)

I bought this mongoose from a yard sale because the front forks on my good bike were too thin and made of graphite.  I also picked up one of those kid carriers that I can hitch onto the back of the bike for the grocery store.

will post pics of that latter.

I got one of those kid carriers the other day they rock.  I put a plastic box that fits long ways perfectly inside it when I do the shopping.   I ride my still working Curry Dyno brushed bike with the carriage right up beside the front automatic sliding door of the local IGA and I just dump the groceries in it. whir off into the distance.  It makes shopping with a car look retarded.  These is some room to put another set of batts underneath the seat for extra distance...

Bring it on

Offline Nicobie

  • Confirmed
  • Junior Member
  • **
  • Posts: 36
Re: Video updates of my Set up.
« Reply #5 on: September 21, 2008, 11:40:01 PM »
no prob nick.  hope it isn't wired backwards like I read about another one on this forum.  you might want to check before you plug it into your battery (just in case)


Well, the charger U sold me does not work.  I went by all the rules on the sticker on the side. As I can't pitch a bitch at GM on a used charger, I figure U will have to do it for me or refund me something >:( >:( >:( >:( >:(.

Offline Leslie

  • Confirmed
  • PhD. Magic
  • ******
  • Posts: 2,047
Re: Video updates of my Set up.
« Reply #6 on: September 21, 2008, 11:58:28 PM »
no prob nick.  hope it isn't wired backwards like I read about another one on this forum.  you might want to check before you plug it into your battery (just in case)


Well, the charger U sold me does not work.  I went by all the rules on the sticker on the side. As I can't pitch a bitch at GM on a used charger, I figure U will have to do it for me or refund me something >:( >:( >:( >:( >:(.

Not if your batteries are wired wrong..  And two chargers blown in the same manner is pointing at the possibility the setup could be wrong. When you charge your batteries is the controller switched on at all?

With my setup Ive wired the switch so you cant charge the batteries if the controller is turned on you must switch the bike off to get a charge into it and I installed a 2.5 amp fast blow fuse in the rig incase of problems....  That said some pics of your setup would make things a little easier to help you,,,
« Last Edit: September 22, 2008, 12:01:14 AM by Smeee »

Bring it on

Offline Nicobie

  • Confirmed
  • Junior Member
  • **
  • Posts: 36
Re: Video updates of my Set up.
« Reply #7 on: September 22, 2008, 05:59:49 PM »
I've got the batteries wired right and the controller is isolated from the batteries when charging. The charging circuit is fused with a 3A fuse. the controller has a 30A fuse inline. Everything works fine when I run at 36v and use a 36v charger from a Razor scooter I bought on ebay. I added another 12v sla battery in series so I would then be running at 48v. Until I bought the 48v charger I used the 36v one on 3 of the 12v ones in series and a 12v charger on the 4th. System voltage shows 53+ volts at rest on my Watts Up  meter. Like I said everything works fine until I hook up the 48v GM charger. BTW, this is a GM kit that is wired like it came from GM.

When the first charger fried I sent GM and GM's US distributor emails about this and received no answer. I even called up the distributor in Oakland, CA but all I could get was an answering machine and they didn't return my calls. I suppose I'm just screwed... >:(

Nick

Offline Leslie

  • Confirmed
  • PhD. Magic
  • ******
  • Posts: 2,047
Re: Video updates of my Set up.
« Reply #8 on: September 23, 2008, 03:56:33 AM »
Dont trust the colors white and black...

erm substitute to brown and blue...

Really swell bike Paintingloft for your first bike. My bike is going really well now.  You are an inspiration to EV'ers around....

I checked your work out at http://www.paintingloft.com (your site?) Scott Holloway is it? You not only do art with ev's your art is miles above the standard finger painting.

Here is our web site. http://www.reanimatedresidue.com My wife is good with different styles like stipple and I help her code the forums and stuff and help her do the imaging.


Bring it on