Author Topic: Simple, cost effective way for temporary high voltage fun  (Read 12997 times)

Offline RooGM

  • Confirmed
  • Magic Undergrad
  • ***
  • Posts: 58
Simple, cost effective way for temporary high voltage fun
« on: May 24, 2015, 12:39:26 AM »
I'm running my MP4 with a 36v 10AH LifePo4 and it works well for me with great range (22+km).  I'm thinking of going to 48v for some more fun on some hard packed trails but not willing to spend $500-600 on a whole new battery pack and charger.  Here's my idea: 

I buy 4 or 6 of these 10AH cells: http://www.goldenmotor.ca/products/10AH-LiFePO4-Cell.html
I wire them up as a 4S or 6S pack, separate from my main pack
I set up my connectors so that when I want to run higher power (when I'm not commuting) I can connect the pack in series with the main pack as an add-on to my system.

This would allow me to use my existing 36v charger to balance-charge my main pack and use my RC Hobby charger (which can charge up to 6S) to balance-charge the add-on pack separately.  I wouldn't need to buy a new charger or BMS.  The MP4 will cut power when the combined voltage from both packs reaches the safe cut off level and when I go to charge the packs I would balance charge both.

When I'm using the bike just to get from A-B or to go for leisurely rides with my partner and her Smart Pie I would remove the add-on pack to reduce weight and go back to the more minimal looking setup.

Does anyone see any problems with my plan?


Offline Ron

  • Confirmed
  • Junior Member
  • **
  • Posts: 37
Re: Simple, cost effective way for temporary high voltage fun
« Reply #1 on: May 26, 2015, 12:38:48 AM »
It should work but the BMS will not prevent your extra cells from over discharging.  Assuming they are good cells I can't see this being a problem though as they *should* discharge the same as your pack.  I would manually check the voltage for the first while to be sure everything is ok.  I would fuse the extra pack with a 40amp fuse to ensure protection in the case of a short.  You might want to place them in a box or get some sort of protection for them so they don't get damaged.  I run 44V 15AH of Lipo without any BMS, not recommended but if your careful you can get away with lots of stuff.   ;)


Keep us posted on how it works out as I'm sure other people would be interested in this. Good luck!

Offline RooGM

  • Confirmed
  • Magic Undergrad
  • ***
  • Posts: 58
Re: Simple, cost effective way for temporary high voltage fun
« Reply #2 on: May 26, 2015, 02:10:29 PM »
Thanks for the reply, Ron.  Yeah the add-on pack won't have its own BMS whereas the main pack does have a good BMS wired into it.  The add-on pack will reply on the Magic Pie when I'm riding.  I can charge and balance it with my RC hobby charger at home.  Once both packs are charged and connected in series, shouldn't the Magic Pie low voltage cut-off feature protect both packs when riding as it would cut power when the overall voltage drops too low? I have never run my bike battery down to the point where the power cuts out.  Last night I rode 35km and although the 3 LED indicator was on red I still had some power left.


Offline Ron

  • Confirmed
  • Junior Member
  • **
  • Posts: 37
Re: Simple, cost effective way for temporary high voltage fun
« Reply #3 on: May 28, 2015, 03:25:51 PM »
If your going to rely on the MP4 LVC you will have to change it each time you change your battery configuration.  I know this is an obvious step.  If you forget to do the LVC and rely solely on it you could ruin the extra cells.

Offline RooGM

  • Confirmed
  • Magic Undergrad
  • ***
  • Posts: 58
Re: Simple, cost effective way for temporary high voltage fun
« Reply #4 on: May 29, 2015, 12:57:27 PM »
Hi Ron,

Yeah I figured that but last night I came up with a solution.  I dug out some 7AH Lipo cells and soldered up a 4S pack to act as my add-on pack.  When in series with my 36v LifePo4 pack this gives me 58.6v when both packs are fully charged.  I programmed the MP4 for 36v with a high voltage protection of 59v and a low voltage protection of 31v.  When the little add-on pack is plugged in I get amazing power and a top speed of 47km/h.  And simply by unplugging the deans plug and plugging in the main LifePo4 pack on its own I go back to the 36v original setup.  No programming between is required.

I installed a small LED voltage meter dedicated to the 4S Lipo add-on pack so I can keep an eye on the voltage of that pack when I'm using it.  Today I am wiring in a switch for my handlebar that will let me switch between the 36v and the 48v setup on the fly.  This essentially gives me a turbo boost mode that I can switch to when I want some great power.  Then I can switch back to 36v for 32km/h cruising.

I have to say I'm thrilled with this addition and the best part is that it didn't cost me anything as I had an old 7AH 10S Lipo with a bad cell that I was able to harvest the 4 cells from.  I am making up a second turbo boost pack for my partner's bike.  Each turbo boost pack is only about the size of a can of coke.

The only problem is that when on 48V I lose regen braking.  I have tried various settings for the braking but it won't work properly on 48v.  When testing with the wheel off the ground if I hit regen when it's going fast, it actually goes faster for a second, then cuts power to the motor (as it should) but does not give any regen braking at all.   

Offline Ron

  • Confirmed
  • Junior Member
  • **
  • Posts: 37
Re: Simple, cost effective way for temporary high voltage fun
« Reply #5 on: May 31, 2015, 12:51:46 PM »
Hi RooGM,

I like your solution!  The BMS takes care of LVC when your running 36V and the MP4 takes care of LVC for 48V operation.  The lack of regen intrigues me.  I've not been able to get regen working on my 12S Lipo setup no matter what setting I tried.   There are threads on it in this forum. http://goldenmotor.com/SMF/index.php?topic=5365.0  For your setup it might be the regen voltage is going over 59V and the high voltage cutoff of the MP4 is kicking in.  Does you regen still not work when both your total battery voltages are much lower than the HVC?

Offline RooGM

  • Confirmed
  • Magic Undergrad
  • ***
  • Posts: 58
Re: Simple, cost effective way for temporary high voltage fun
« Reply #6 on: May 31, 2015, 07:30:09 PM »
Yeah I thought it was the HVC so I raised it to 62V which is the maximum but still no regen when in 48v mode.  Even when I've been for a 10k blast and run the batteries down a bit I get no regen.  I don't mind that much as I have front and rear disc brakes but it would be good to figure it out.

I finished the build today and here are some pics.  You can see the "turbo-boost" pack at the front.  The double battery assembly is held to the frame with 3M Dual Lock strips (amazing things!) and the black elastic velcro strips are to make sure it doesn't come outwards off the dual lock strips, even though it's unlikely but it adds an extra layer of hold without being permanent.  I can quickly remove the whole battery and switch assembly in 15 seconds and take it in to charge. 

The little red switch turns on the LED voltmeter and the 3 position toggle switch is an ON, OFF, ON switch and it switches between 36v, OFF and 48v.  I absolutely love the setup.  Now I can instantly switch between 36v and 48v on the fly.  One problem is that the switch only works if I flick it really quickly.  If I flick it say from ON (either 36v or 48v mode) to OFF at a normal speed the power remains on.  I thought the switch was defective so I exchanged it and it's the same problem.  It's a heavy duty 12v 50 amp switch and only being flicked when stationary so it is not being overloaded.  It's a real nuisance because it can be hard to flick it to the central OFF position as a great speed without flicking it on over to the other voltage setting.  Is there a way I can understand/fix this?  Maybe with a capacitor soldered in parallel with the switch?

 
« Last Edit: May 31, 2015, 07:34:36 PM by RooGM »

Offline Bikemad

  • Global Moderator
  • Professor
  • PhD. Magic
  • ******
  • Posts: 5,553
Re: Simple, cost effective way for temporary high voltage fun
« Reply #7 on: May 31, 2015, 07:56:49 PM »
One problem is that the switch only works if I flick it really quickly.  If I flick it say from ON (either 36v or 48v mode) to OFF at a normal speed the power remains on.  I thought the switch was defective so I exchanged it and it's the same problem.  It's a heavy duty 12v 50 amp switch and only being flicked when stationary so it is not being overloaded.  It's a real nuisance because it can be hard to flick it to the central OFF position as a great speed without flicking it on over to the other voltage setting.  Is there a way I can understand/fix this?  Maybe with a capacitor soldered in parallel with the switch?

I suspect the switch is working fine and the power you are seeing is probably being generated by the motor.
If your voltmeter is on the controller side of the switch it would show the generated voltage instead of the actual battery voltage when the switch is in the off position.

Does the throttle still work when the switch is in the middle position or just the battery gauge LEDs?

With the battery turned off, if you pedal fast enough the battery LEDs will usually light up. ;)

Alan
 

Offline RooGM

  • Confirmed
  • Magic Undergrad
  • ***
  • Posts: 58
Re: Simple, cost effective way for temporary high voltage fun
« Reply #8 on: June 01, 2015, 12:38:19 AM »
The little red LED is wired up only to the separate "turbo boost" battery so I can monitor the voltage of that pack.  It's a closed off circuit from the rest of the electrical system.  The problem I was talking about is actually that the power to the MP4 remains on even when the toggle switch is turned to the off position, unless I flick it really fast.  Even then sometimes it remains on.  What I'm saying is that when the switch is set to off it is still connecting the circuit and the MP4 still has full power.  I have bought two of these switches and both do the same thing. 

Offline Bikemad

  • Global Moderator
  • Professor
  • PhD. Magic
  • ******
  • Posts: 5,553
Re: Simple, cost effective way for temporary high voltage fun
« Reply #9 on: June 01, 2015, 04:24:42 PM »
Something doesn't sound quite right, if the contacts are open there should be no current flowing from the battery.
Is there any chance you can post a circuit diagram showing exactly how the batteries are wired to the switch?

Also, does the switch have three or six connector pins, as it might be an On:On:On switch instead of an On:Off:On switch?

Do you have a website link to the switch?

Alan
 

Offline RooGM

  • Confirmed
  • Magic Undergrad
  • ***
  • Posts: 58
Re: Simple, cost effective way for temporary high voltage fun
« Reply #10 on: June 03, 2015, 01:36:54 AM »
This is the switch: http://www.repairconnector.com/6-or-12-volt-50-amp-heavy-duty-on-off-on-toggle-switch/

But I paid 3 times that price at Canadian Tire.  I've sketched out how I have it wired up.  It's not exactly what I'd call a circuit diagram but I hope this is enough to explain it.  Thank you for looking over this for me. 


Offline Bikemad

  • Global Moderator
  • Professor
  • PhD. Magic
  • ******
  • Posts: 5,553
Re: Simple, cost effective way for temporary high voltage fun
« Reply #11 on: June 03, 2015, 04:16:06 PM »


The way you've wired the switch is a little bit unorthodox, normally the switching is performed on the positive lead to isolate the high voltage from the circuit when the switch is turned off, like this:


Even though you're switching the negative circuit, it shouldn't prevent your circuit from disconnecting the motor from the battery when switched off, unless the switch contacts have arced themselves together and are not able to spring apart when released. The arc occurs due to the momentary high current surge that charges the capacitors in the controller and causes the loud spark when you connect the battery using exposed connectors instead of an enclosed switch.

I once tried to video this spark using a pair of male connectors so the spark would be visible, but during the dummy run, I accidentally touched the battery connector pins together which created a direct short circuit accompanied by a very loud bang and bright flash which instantly melted the copper contacts that I was carefully holding:


A big blob of molten copper landed on my wattmeter and instantly embedded itself into the edge of the display:


Another blob (which thankfully was a lot smaller) landed in my lap and managed to burn my leg through the thick denim jeans I was wearing, but it could have been a lot worse if I'd been wearing nylon trousers or shorts instead of jeans.

The moral of this story is don't play with unfused LiPo packs as they will attack when suitably provoked!

Alan
 
« Last Edit: July 02, 2017, 07:52:38 PM by Bikemad »

Offline RooGM

  • Confirmed
  • Magic Undergrad
  • ***
  • Posts: 58
Re: Simple, cost effective way for temporary high voltage fun
« Reply #12 on: June 03, 2015, 07:47:22 PM »
Ouch and OUCH!  That could have ended more badly than it did.  I'm so glad no molten metal hit your face or eyes.  Yes I agree that the likely problem is that the contacts are not separating when the switch is flipped at a normal rate.  Flipping it very quickly allows enough speed or momentum for the contacts to separate.  Is there an electrical way around this such as by adding a capacitor or other component?

Does it make a difference having the switch on the positive side or the negative side?  Could this be what's causing the switch to stick?  I really don't understand why it doesn't work correctly.  It is rated for up to 50 amps and when at standstill the current draw is nowhere near that.  It must be the voltage.

For now it is workable and I'm getting used to positioning my other thumb to act as a wall that I can quickly flip the switch lever into without going too far and into the other side ON position.  The fun part is that I can flip from 36v to 48v on the fly whenever I need a boost in power.  For some reason I thought the Pie would need to be switched off before being connected to the higher voltage circuit but apparently not.  I'm really happy with this setup and recommend doing something similar if you want to have some higher voltage power on a budget while still being able to run in 36v mode for a more gentle ride.

Offline Morgen 3Eman

  • Confirmed
  • PhD. Magic
  • ******
  • Posts: 620
Re: Simple, cost effective way for temporary high voltage fun
« Reply #13 on: June 03, 2015, 11:20:31 PM »
Hi Folks,

Electrically, it doesn't matter which side of the battery is switched, but one of the first things all electrical guys learn is that you NEVER put a switch in a ground circuit. (Isolated ground circuits can kill people)   By common usage, battery negatives have become referred to as the ground side.  So,  a switch on the black wire of a battery circuit has become the worng way to do it.  (all the letters are there, so it has to be OK to use it that way….right?) 

TTFN,
Dennis

Offline Bikemad

  • Global Moderator
  • Professor
  • PhD. Magic
  • ******
  • Posts: 5,553
Re: Toggle switch
« Reply #14 on: June 04, 2015, 01:42:26 AM »
Here's a nice animation that clearly shows how the switch contacts typically operate inside an "On-Off-On" toggle switch:
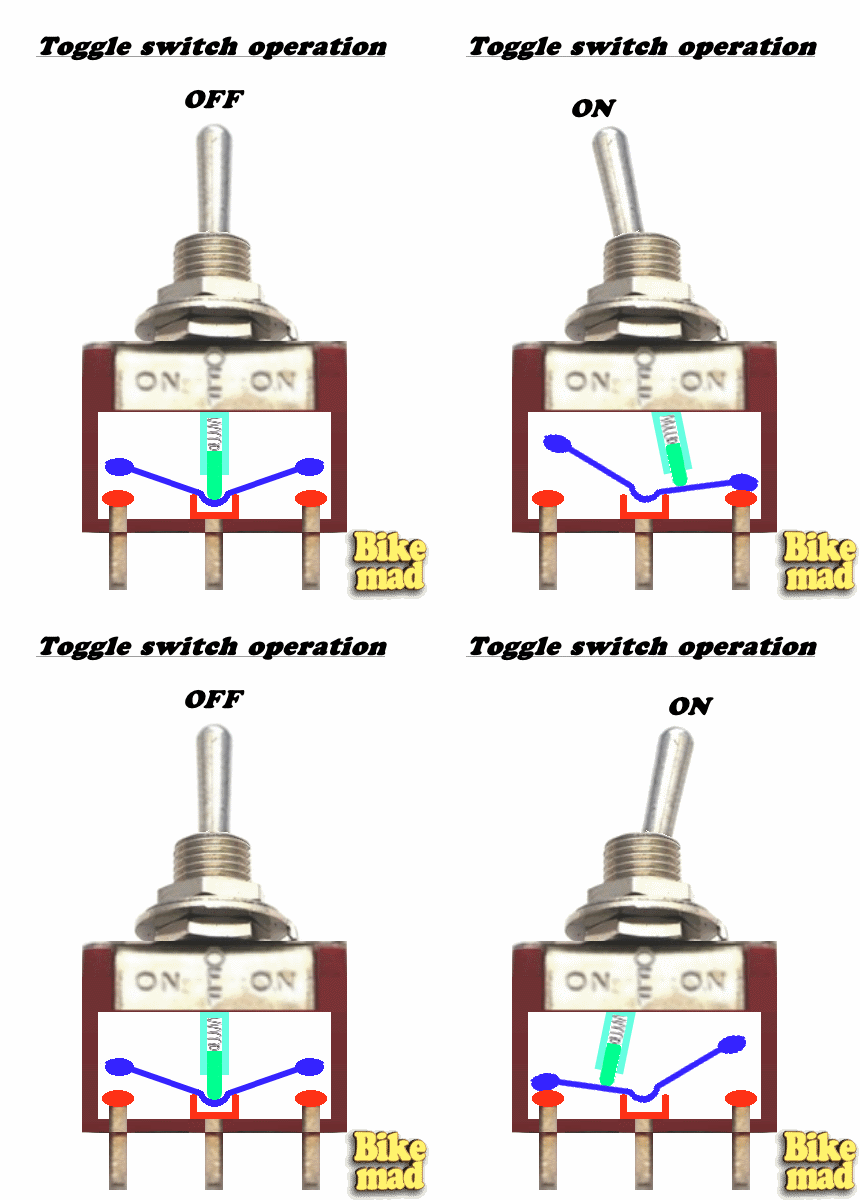


In the Off position, the spring loaded plunger is extended and exerts less pressure on the the rocking contact. In addition to this, if the contacts have arced together the pressure being applied in the Off position is only a couple of mm from the fulcrum point whereas the stuck contacts are about 8mm from the fulcrum so they have a mechanical advantage of around 4:1.
This means that the little spring would have to exert four times the force required to break the contacts apart in the Off position.
If the contacts are stuck together and you push the switch across to the other side, the spring will compress more, but more importantly, the rigid plunger housing would exert direct pressure on the rocker arm forcing the contacts to be released.

You can see what I mean by placing a piece of paper on your monitor with its edge running along the upper side of the rocker when it is fully raised, you should notice that the end of the plunger housing (switch shaft) will disappear behind the edge of the paper at the point at which it would press against the stuck rocker arm.

I suspect that the reason your switch releases when you flick it quickly is because the plunger flicks quickly into the recess in the middle of the rocker arm and the sudden impact is probably enough to shock the contacts apart. When the switch is moved slowly, the plunger gently slides into the recess with no impact force. Unfortunately I cannot think of an electrical way of overcoming the problem.

I think the best solution would be to have a separate "On-Off" switch for the power (you could even use the other "On-Off-On" switch you already have) and use the existing switch as a two position "On-On" voltage/speed selector by simply ignoring the centre "Off" position.


Dennis, unfortunately not all electricians are equipped with common sense.
I have had two incidents over the past five years where I have been working on 240V electrical equipment, after turning off the isolator switch and removing the fuse for additional safety. On both occasions I was fortunate enough to just receive a tingly zap as a warning, and on further investigation the cause was incorrect wiring of the fused isolator switch.
In both cases the incoming mains supply and the output for the equipment had been placed together in the same connections instead of one in the input and the other in the outlet:
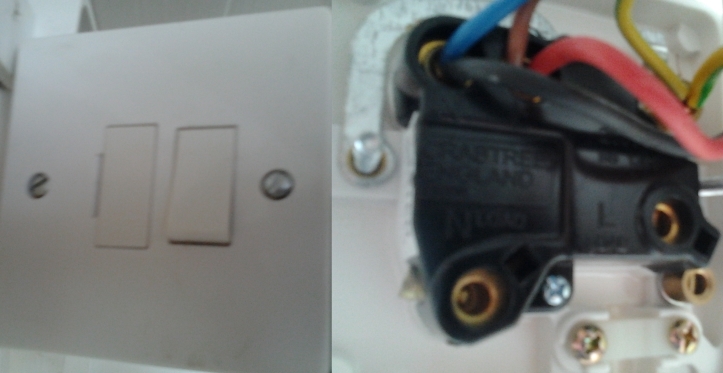


So not only could I have been electrocuted, but the equipment that the fuse should have been protecting was not even fused.
Imagine what might have happened if I had undone the mains cable from the appliance end and the live wire touched against Neutral or the metal chassis that I probably would have been holding. :o

I now test electrical appliances with a voltmeter to make sure they are "safe to enter" before I go anywhere near them as I have lost all confidence in so called electricians, and knowing my luck it might be third time unlucky!


Alan
 
« Last Edit: July 02, 2017, 07:46:52 PM by Bikemad »