Author Topic: MP2 to MP III upgrade  (Read 4824 times)

Offline David S

  • Confirmed
  • New Member
  • *
  • Posts: 5
MP2 to MP III upgrade
« on: July 24, 2015, 04:58:53 AM »
My MP2 died and I suspected a faulty controller which is difficult to replace so I recently ordered a new MP3, but on connecting it get no lights at the throttle. The 48v Li Po battery, 5 years old is fully charged according to the charger (green light), but after purchasing a multimeter today, it reads 45 v at the battery output terminals. Does that mean the battery is stuffed?
My second problem is that I'm unsure of what to set in the program parameters when connected to the laptop. Most of it is gobbledegook to me. Is there a sample on the forum to copy? Should I set the voltage at 48v as the battery is 48v?
« Last Edit: July 24, 2015, 05:27:27 AM by David S »

Offline Bikemad

  • Global Moderator
  • Professor
  • PhD. Magic
  • ******
  • Posts: 5,504
Re: MP2 to MP III upgrade
« Reply #1 on: July 24, 2015, 10:40:45 AM »
Hi David,

Your battery voltage is not very good as it should be reading ~54.6V if fully charged.
I think it is more likely that your battery has died and not your controller.

Leave the battery on charge for 24 hours and see if the voltage will increase to a usable level, although I suspect it is probably beyond recovery and may need to be replaced.

Here is a screenshot of some typical MPIII settings:


As I use mine off-road, I like to have the current set to maximum for both the Continuous and Peak, but these would need to be lowered to comply with legal power restrictions.

If you are not using Pedal Assist, the PAS section can be ignored, otherwise you set the level of assistance to suit your preference.

With a rear mounted MPIII I usually have the RPM (or Acceleration) set to 100% for a quick throttle response.

With the early MPIII controllers it would sometimes produce more torque with the controller voltage set at 24V when a 48V battery was used. But with the later controllers it might be better to use the 48V battery setting with a 48V battery.

I have the FWD Speed Scale set to maximum, but you may need to lower this if you need to comply with the legal maximum speed.

If you don't use the Reverse function it might be better to Disable it to ensure it cannot accidentally operate if the unused reverse wires inadvertently touch each other.

I have the Regen Brake set to maximum on mine (116% with the later programming software) as I live in a very hilly area and prefer to use the regen to slow me down instead of wearing out my brakes. ;)

I have also attached a copy of the GM programming instructions for the MPIII and non-vector Smart Pie controllers.

Alan
 
« Last Edit: July 02, 2017, 10:41:28 PM by Bikemad »

Offline David S

  • Confirmed
  • New Member
  • *
  • Posts: 5
Re: MP2 to MP III upgrade
« Reply #2 on: July 25, 2015, 09:21:38 AM »
Thanks Alan,

Yes I feared the battery was kaput, but wanted confirmation before ordering another. Also I made an error, my motor is the MP4 which shows a different screen for the parameter adjustment.

Dave

Offline Bikemad

  • Global Moderator
  • Professor
  • PhD. Magic
  • ******
  • Posts: 5,504
Re: MPII to MP4 upgrade
« Reply #3 on: July 25, 2015, 11:58:24 AM »
Yes I feared the battery was kaput, but wanted confirmation before ordering another.

It might be worth checking the voltage on the charging socket to see if it is still the same, just in case there is a problem with the battery switch contacts.

Also I made an error, my motor is the MP4 which shows a different screen for the parameter adjustment.

With the MP4 and SP4 vector controllers it is extremely important to make sure that the voltage setting in the controller matches your battery voltage, as it would not work at all if the controller voltage was set at 24V and you were using a 36V or 48V battery.

Here is a screenshot of some typical MP4 parameter values at all three voltage settings:


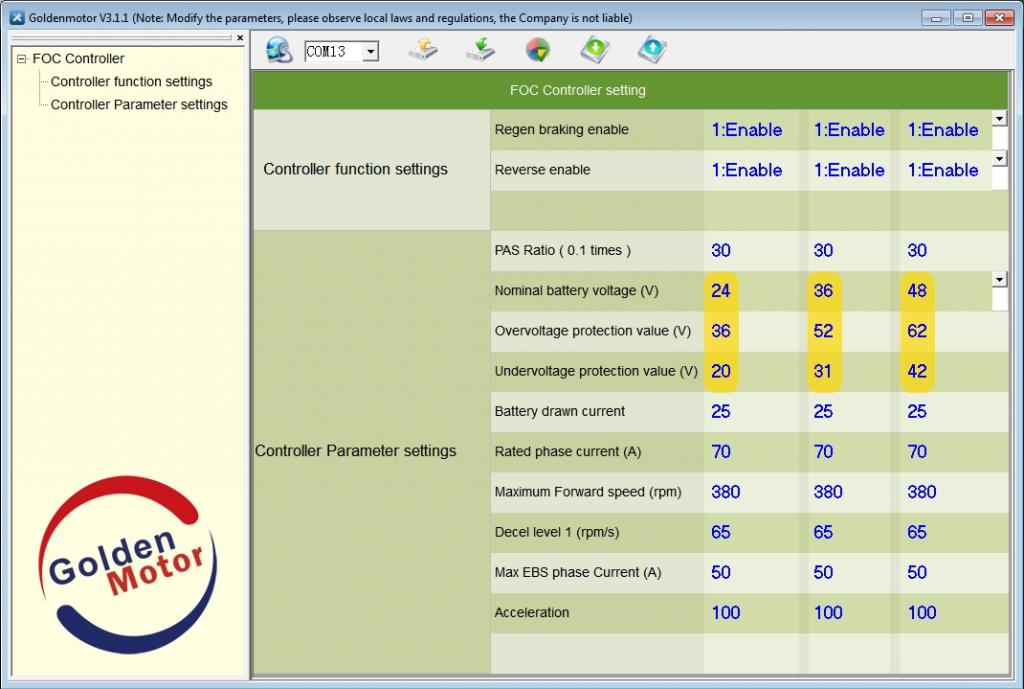
The available settings for the vector controller (MP4 and SP4) are slightly different:

The PAS Ratio ( 0.1 times ) adjusts the amount of assistance in relation to the pedal speed (Cadence) and allows a lot more adjustment than the previous High, Medium or Low settings that were available on the earlier controllers.

The Nominal battery voltage (V) setting must be set to match the battery being used or you could experience problems with the regenerative braking not working correctly or the motor failing to run at all.

The Overvoltage protection value (V) can be reduced if required to protect a battery pack without a BMS against overcharging during regen.

The Battery drawn current sets the maximum amount of current that can be drawn from the battery. The higher the current, the higher the power produced by the motor. I have mine set on maximum for off-road use, but you may need to reduce this to comply with the legal maximum power for road use.

The Rated phase current (A) sets the maximum amount of pulsed current allowed to flow through the motor's stator windings. This will affect the power and torque of the motor, so I have this set on maximum too.  ;)

The Maximum Forward speed (rpm) makes it easier to set an exact speed by entering the maximum speed into this spreadsheet and finding the required maximum Wheel rpm to suit your particular wheel size. Please not that you will need to click the "Download" or "Open" option in the top right corner of the webpage before you can alter the contents of the spreadsheet.

The Decel level 1 (rpm/s) is actually the maximum wheel rpm when in reverse (if a reverse switch is wired up and the Reverse function is enabled).

The Max EBS phase Current (A) controls the amount of regenerative braking force. The higher the current, the greater the regen braking force. This should be adjusted to suit the rider's preference.

The Acceleration setting controls the response of the motor in relation to the throttle. At 100% the motor response is almost instant and can be a bit too jerky. Lowering the setting will produce a much smoother acceleration and should also extend the range. This setting will definitely need to be reduced if using a front motor in order to prevent wheelspin on loose or wet road surfaces.


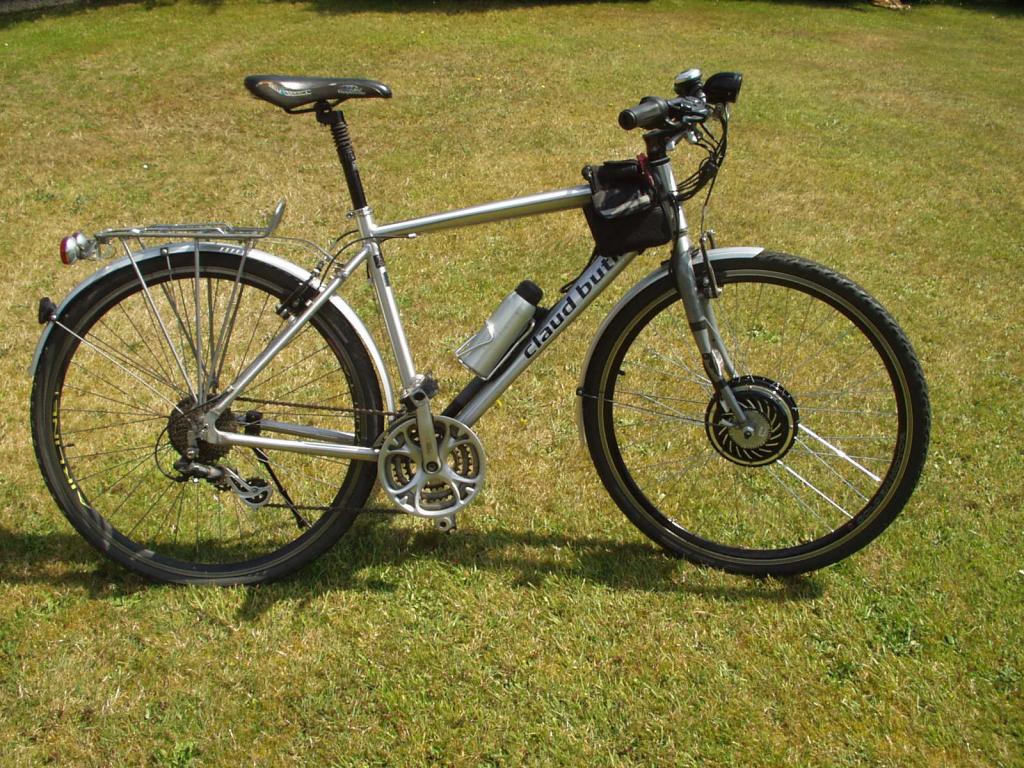
Even with a large diameter 700c wheel equipped with the lower power Smart Pie 4 and a front mounted battery pack I had to reduce the acceleration to 80% to prevent wheelspin on loose surfaces.
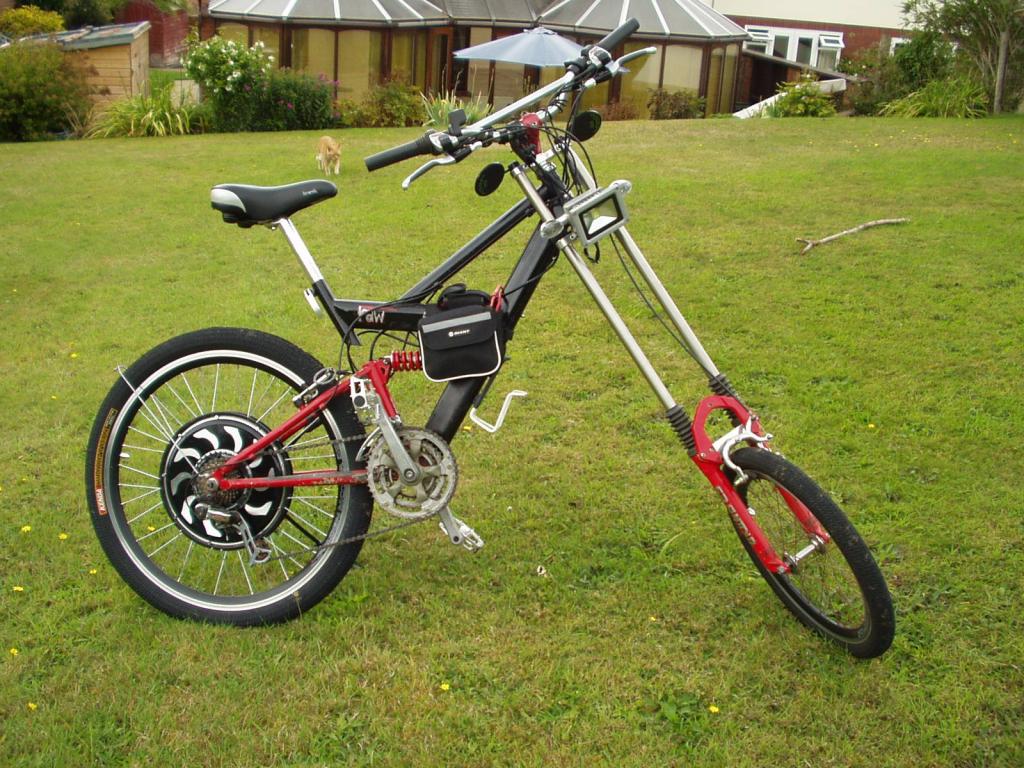


The above "Wheelie Machine" has a rear mounted MP4, but I the acceleration setting had to be reduced to 70% before I could pull away on hills without the front wheel jumping off the ground, and that's with a mid mounted 29.6V battery pack.
I think I would really struggle to keep the front wheel in contact with the ground if I had a large 48V battery hanging out over the back wheel. ;D

Alan
 
« Last Edit: July 02, 2017, 10:40:57 PM by Bikemad »

Offline Dirk

  • Confirmed
  • New Member
  • *
  • Posts: 14
Re: MP2 to MP III upgrade
« Reply #4 on: July 25, 2015, 01:45:37 PM »
My experience and question is similar. I last year purchased a MP2 with external controller, and both a 24v and a 48v throttle. Had to wait to save up for the battery, and received a new 48V battery this spring. Once it was all hooked up there was no lights and no response with the controller. A dealer suggested that the controller was set a 24v. So I will soon be going the USB route.
My questions are,
 "If the Controller is set at 24volts and connected to 48 Volt Battery will it just ...do nothing, act as if dead?" ?
The manual says plug the battery in and the USB to the PC, then reset voltages. BUT, if it is originally set a 24, and the battery I am connected to is a 48 volt battery will that even work, for the purposes of resetting the program via the USB?

Offline Bikemad

  • Global Moderator
  • Professor
  • PhD. Magic
  • ******
  • Posts: 5,504
Re: MP2 to MP III upgrade
« Reply #5 on: July 25, 2015, 02:40:16 PM »
Hi Dirk andto the forum.

The later internal vector controllers will not send any power to the motor if programmed for 24V and connected to a 48V battery but the LEDs on the throttle would still light up.
However, the early BAC-281 external controllers will work on 24, 36 or 48V batteries regardless of the programmed voltage setting in the controller.

I don't know which controller was supplied with your kit or whether the later controllers are programmed differently, but I suspect you probably have one of the BAC-28xP controllers.


Regardless of the controller type, I would still expect to see the battery gauge LEDs light up on the throttle even if the controller was set to the wrong voltage.
If the none of the LEDs are lighting up I suspect the throttle unit is not receiving battery voltage, either because the battery gauge feed wire has not been connected or because of a poor connection on the battery connectors or switch contacts.

I suggest you check the voltage on the Battery + and Battery - terminals (on the controller) to make sure at least 52~58V is actually reaching the controller depending upon the battery chemistry (LiMn or LiFePO4).

I would expect the BAC-281 controller to be programmed without the battery connected just like the internal MPII and MPIII controllers.

The internal vector controllers on the MP4 and SP4 now need to have a battery connected before they can be programmed, but it shouldn't matter what battery voltage (24, 36 or 48V) is used for programming purposes as I have successfully programmed the vector controller using a lot less than 24V.  ;)

Also, which manual says, "plug the battery in and the USB to the PC, then reset voltages."?

Alan
 
« Last Edit: July 02, 2017, 03:51:37 PM by Bikemad »