Author Topic: My new bike and its LED lights installation.  (Read 14791 times)

Offline muzza.au

  • Confirmed
  • Bachelor of Magic
  • ****
  • Posts: 156
My new bike and its LED lights installation.
« on: January 30, 2010, 12:21:17 PM »
G'day all,

I thought I would post my latest modification to my e-bike and I think the last for a while, and that is installing perminant LED lights.

As some of the older members might vaguely remember, below is a picture of my old bike.


Then I saw the following on ebay for half price a new months ago and got it. It was only 24v Nimh with a planetary geared hub motor that was way too slow (I could have run faster) and it would only go when pedalling (pedalec).


I then got a new hub, ebay no name brand, 48v 1000w motor. From what I can tell, it may be the same or similar to a Nine Continents motor. I transfered my battery, controller (infineon) and throttle etc. I upgraded the brakes from cable type to 2nd hand Hayes Stroker Ryde Disc Brake Set. And then stuck colors reflective stickers all over it.


Just recently I then bought some dc-dc converters, a white LED globe to go into the front light that came with the bike, a super duper rear LED tail light and some mounting stuff.

The back of my bike before I fit the tail light.

My new tail light fitted.

Front light fitted.

Wiring up the dc-dc converters. I used 2 at this stage, one for each light. They run on 17-75v in and put out 12v.

Wiring up the dc-dc converters. They each have a 0.5a fuse on the input side.

Insulated with electrical tape.

All suffed into a jiffy box.

All done.


And my favourite.

The tires actually have a reflective strip built into them.

ps. The front light is only temporary at this stage as I've ordered a spot light that has 3 3w leds in it. Still on its way from Hong Kong. Will post more pics when its arrived and installed onto the bike.


Muzza.au
« Last Edit: January 30, 2010, 12:27:02 PM by muzza.au »

3Vz9Ycvx

  • Guest
Re: My new bike and its LED lights installation.
« Reply #1 on: January 30, 2010, 08:43:43 PM »
Sweet ride!

Did you do all the mounting work yourself?

Where did you get the metal strips with pre-drilled holes every few centimeters? That stuff looks very useful for mounting various components.

Jiffy box? Where did you find those?

Impressive work!

Offline muzza.au

  • Confirmed
  • Bachelor of Magic
  • ****
  • Posts: 156
Re: My new bike and its LED lights installation.
« Reply #2 on: January 30, 2010, 10:52:59 PM »
Sweet ride!

Did you do all the mounting work yourself?

Where did you get the metal strips with pre-drilled holes every few centimeters? That stuff looks very useful for mounting various components.

Jiffy box? Where did you find those?

Impressive work!
I did it all myself.

The metal strips are from a hardware store. I think they are meant for use in house contruction to reinforce the wood framework. I cut them into the lengths I wanted, bent them and rivetted them together to form a cage to protect my GM 36v Lifepo4 battery, as I lock up my bike at a train station every day.

A jiffy box is a small plasteic box you get from an electronics store so you can make your own kits or electronic projects, or in my case to house th wiring and dc-dc converters and to keep them dry. I got mine from a store here in Australia called Jaycar.


Muzza.au

Offline Jazzjerry

  • Confirmed
  • Bachelor of Magic
  • ****
  • Posts: 130
  • Carpe Noctum
    • Beeldhout
Re: My new bike and its LED lights installation.
« Reply #3 on: January 31, 2010, 05:39:00 PM »
Where did you buy the dc-dc converter, what are the spec's and how much was it?

I have been trying to find a 48v input one online but have not been able to find one suitable yet.

Best Regards,

JJ
. _   _   __  __  ___  ____  ____  _     _   ____  ____
 ( )_( ) (  ) (  )(  _ \ (  _ \ (  _  )(  \/\/ ) ( ___) (  _ \
  ) _ (   )(__)(  ) _<  )___/ )(_)(  )      (   )__)   )    /
 (_) (_)(_____)(__ / (__)  (____)(__/\__)(____)(_)\_)

Offline Sangesf

  • Confirmed
  • Bachelor of Magic
  • ****
  • Posts: 180
Re: My new bike and its LED lights installation.
« Reply #4 on: January 31, 2010, 06:45:30 PM »
Where did you buy the dc-dc converter, what are the spec's and how much was it?

I have been trying to find a 48v input one online but have not been able to find one suitable yet.

Best Regards,

JJ

a quick search on eBay yielded about 30 results of 48 to 12v with a range of 15 to 30 USD cost..

What specifically are you looking for?

Offline muzza.au

  • Confirmed
  • Bachelor of Magic
  • ****
  • Posts: 156
Re: My new bike and its LED lights installation.
« Reply #5 on: January 31, 2010, 07:00:21 PM »
Where did you buy the dc-dc converter, what are the spec's and how much was it?
I got it on ebay -> DC/DC power converter 18-75V in, +/- 12V dual out, 6W They are currently going for $2.65us each.

Technical Details
Datasheet
Applications:      Voltage regulation
Input Voltage:   18-75VDC  
Output Voltages: +12VDC, -12VDC
Output Current:  170mA/channel
Isolation:           1500VDC
Efficiency:         82%
Output Regulation +/- 120mV Max
Operating Temperature -40°C - 110°C
Power - Output 6W

Muzza.

ps. they are meant for surface mount. At first I soldered the wires onto the legs, but one broke off. But fortunately where the components are there are posts or pins that I soldered onto and are strong enough.
« Last Edit: January 31, 2010, 07:08:33 PM by muzza.au »

Offline Sangesf

  • Confirmed
  • Bachelor of Magic
  • ****
  • Posts: 180
Re: My new bike and its LED lights installation.
« Reply #6 on: January 31, 2010, 07:38:08 PM »
I'm guessing 170ma is enough to power an entire set of LEDs?

If so, you could buy a small 12v 6ah battery to power the lights and I'm sure it would last at least a couple of weeks until you would have to charge it again.

Unless, of course, you're riding ALOT at night and even then would have to recharge it only once a week.

FYI I've added a 12v 18ah battery to my bike just to run ALL of my electronics (radio, satellite radio, brake /turn signal lights {incandescent}, LED front lights, audio amps and 12v power socket)
I only have to charge it once a week, but I don't ride much at night.
 

Offline muzza.au

  • Confirmed
  • Bachelor of Magic
  • ****
  • Posts: 156
Re: My new bike and its LED lights installation.
« Reply #7 on: January 31, 2010, 09:00:27 PM »
I'm guessing 170ma is enough to power an entire set of LEDs?
As the post says above, I'm using 2 converters. One for the back light and one for the front. Yes the output is enough, at the moment. When I get the new front light, I may have to use more than one for the front. I still have 2 spare I can use.
If so, you could buy a small 12v 6ah battery to power the lights and I'm sure it would last at least a couple of weeks until you would have to charge it again.
I already have a rechargable battery on my bike. ;D

Muzza.

Offline Jazzjerry

  • Confirmed
  • Bachelor of Magic
  • ****
  • Posts: 130
  • Carpe Noctum
    • Beeldhout
Re: My new bike and its LED lights installation.
« Reply #8 on: February 01, 2010, 11:46:40 AM »
I would like to mount more then 10 High amp leds.

. _   _   __  __  ___  ____  ____  _     _   ____  ____
 ( )_( ) (  ) (  )(  _ \ (  _ \ (  _  )(  \/\/ ) ( ___) (  _ \
  ) _ (   )(__)(  ) _<  )___/ )(_)(  )      (   )__)   )    /
 (_) (_)(_____)(__ / (__)  (____)(__/\__)(____)(_)\_)

Offline GM Brazil

  • Confirmed
  • Master of Magic
  • *****
  • Posts: 275
Re: My new bike and its LED lights installation.
« Reply #9 on: February 01, 2010, 01:10:52 PM »
Quote
The tires actually have a reflective strip built into them.


I really love your tires :D Do you know the manufacturer?

Offline muzza.au

  • Confirmed
  • Bachelor of Magic
  • ****
  • Posts: 156
Re: My new bike and its LED lights installation.
« Reply #10 on: February 01, 2010, 06:57:14 PM »
Quote
The tires actually have a reflective strip built into them.


I really love your tires :D Do you know the manufacturer?
Yes, they are Kenda. I couldn't see any model or anything, just the brand.

Muzza.au

ps. a google search turned up a few models. Other manufacturers do them too. Look for "reflective sidewall".
« Last Edit: February 01, 2010, 09:02:56 PM by muzza.au »

Offline muzza.au

  • Confirmed
  • Bachelor of Magic
  • ****
  • Posts: 156
Re: My new bike and its LED lights installation.
« Reply #11 on: February 04, 2010, 10:22:04 AM »
G'day all,

I've been testing my new LED light.

Its very very bright. Too bright in fact.

The specs say it can run on 12-30v, but I've found that I can get it to put out half intensity at 8v. I think that would be perfect for normal commuting and not too bright for oncoming traffic.

What I want to do now is set it up so that I can run it on 8v for normal use and have a switch where I can set it to high beem so to speak. I will be using the dc-dc converters mentioned above. I have 3 at my disposal. What I want to know is to get the light to run on 8v can I say put a couple of resistors on the output of the dc-dc converter and tap off 8v from the 12v? I would then set up a relay to bypass the resistors to put the full 12v into the light for high beem. What do you think?

Muzza.au

Offline Bikemad

  • Global Moderator
  • Professor
  • PhD. Magic
  • ******
  • Posts: 5,497
Re: LED Voltage and Current regulators
« Reply #12 on: February 04, 2010, 11:54:40 AM »
What I want to know is to get the light to run on 8v can I say put a couple of resistors on the output of the dc-dc converter and tap off 8v from the 12v? I would then set up a relay to bypass the resistors to put the full 12v into the light for high beem. What do you think?

Muzza, It should be much simpler than that:

All you should need is a suitable resistor put in series with the light to reduce the current.
Measure the current at 8V and make a note of it.
go to http://led.linear1.org/led.wiz and enter the details as shown in the attachment below, but use your measured current (in mA) instead of my guesstimated 400mA and see what the result is.

Although your light has three LEDs, I've treated it as a single 9Watt 750mA LED to save any confusion.

The resistor will probably need to be rated for at least 2 Watts.
You can use four 2 Watt resistors in a series parallel configuration to reduce the load on them if you want them to run cooler.
The four 10 Ohm resistors will still have the same resistance as a single 10 Ohm resistor, but the heat generated will be divided evenly into the four resistors.

To switch to high beam, you simply put a switch directly across the resistors to bypass them.
A relay will not be required with this low amount of current.

There are other ways to do it by using one of these:

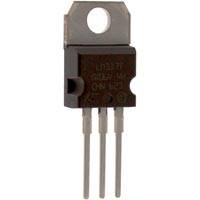
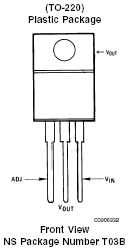
a LM317T voltage regulator chip
(and one or two resistors):
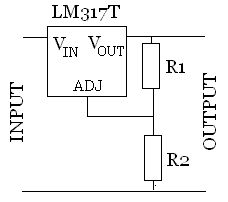

Voltage regulation circuit.


If you use the voltage regulation method, you would use a variable resistor for R2 to adjust the intensity of the low beam, and then use a two way switch to switch between the regulated output and the unregulated input for low or high beam.
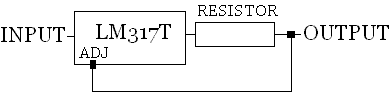

Current regulation circuit.


This will need to use a 1Watt resistor (or four as mentioned above) to handle the current. Simply use a switch to bypass the current regulator circuit for high beam.

As the chip will be regulating around 5 Watts, it will need a heat sink to stop it from overheating and cutting out.
Quote
The maximum continuous current which can be managed by the LM317T is 1.5 Amps, and that is with a decent heatsink fitted. The LM338T is rated at 5 Amps of continuous current with 50ms bursts of up to 7 Amps. However with a large heatsink it is possible to manage continuous currents of 8 Amps+.

The LM317T accepts an input voltage from 3 Volts to 40 Volts, and it will cope with an average current of 1.5 Amps. The higher the voltage and the higher the current, the hotter will get the LM317T - therefore a suitable TO-220 heatsink can become essential or the chip will automatically shut down and/or be damaged.


Now you have several options to consider. ;D

Alan
 
« Last Edit: September 05, 2010, 12:28:56 AM by Bikemad »

Offline muzza.au

  • Confirmed
  • Bachelor of Magic
  • ****
  • Posts: 156
Re: My new bike and its LED lights installation.
« Reply #13 on: February 06, 2010, 02:58:50 AM »
G'day all,

Today I just remembered I have some boxes full of old electronic junk and bit and pieces I've been hoarding over the years thinking that some day I may a use for some of it. Well today I had a quick look through one of the boxes and found an old variable resistor. :D

I put it in series with my new light and varied the pot to get just the right brightness. I thought it was going to be complicated. :P To get full brightness all I have to do is put a short across the resistor, which I will do with a switch.

I'm going to get this switch setup and use the red switch to turn high beem on or off and use the green horn button to give a quick flash of the high beem if I want to make sure a car sees me coming. :o

muzza.au

Offline jalthar

  • Confirmed
  • New Member
  • *
  • Posts: 1
Re: My new bike and its LED lights installation.
« Reply #14 on: May 08, 2010, 07:29:28 PM »
Hello
Today I got my new bike light. I order from Ecrater.com
Light based on 3 CREE Q5 LED, 660Lm, working Voltage 12V-30V,
Really Light is very bright.
Thanks
Rahul